Vegan hot cross buns – better than the original (in my humble opinion)

Confession…I don’t even really like hot cross buns. I’ve never been a huge fan of sweet bread or bread with sultanas/raisins in. I’ve never got what all the fuss is about over Easter.

But, here’s the weird thing, this Easter long weekend I woke on Easter Saturday with a craving for them. Bizarre indeed. So, with nothing else on my agenda for the day I googled ‘vegan hot cross bun recipe’ and made the first one I came across which happened to be this one. Pot luck.

IMG_0620.JPG
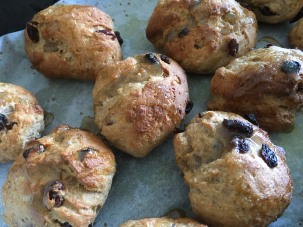
And it was luck, because this recipe turned out to be amazing. Absolutely blo**y delicious. Both my husband and I enjoyed them so much – we ate about three each in as many minutes. They weren’t perfect by any bakers standards but they were fantastic by mine. I couldn’t do the little white cross over them as I didn’t have any powdered sugar, but I made up an oozy sugary topping anyway which tasted lovely just without the perfect looking finish.

And what was really satisfying, apart from the fact that they were vegan and yum, was that they were made from scratch with love. It’s actually really satisfying making your own bread, kneading it and waiting for it to rise. It gave me a real appreciation of the process.

So here it is, the recipe in all its glory (with a couple of revisions from me due only to what I didn’t have in my pantry…)

https://delightfuladventures.com/vegan-hot-cross-buns/

Ingredients:
Dough
  • 2 1/4 teaspoons yeast
  • 1 teaspoon sugar (I used organic caster)
  • 1/2 cup lukewarm water
  • 3/4 cup room temperature/lukewarm unsweetened oat milk (am guessing you could pretty much use any non-dairy milk you like)
  • 1/3 cup oil (I used olive)
  • 3/4 teaspoon salt
  • 1 1/2 teaspoons ground cinnamon
  • 1/2 teaspoon ground nutmeg (I didn’t have any so I used all spice instead)
  • 1/4 cup sugar
  • 1 tablespoon lemon zest (I actually doubled this as was also supposed to be orange zest in the recipe but I didn’t have any)
  • 3 1/2 – 4 cups all-purpose flour (I used half all purpose and half wholemeal)
  • 1/2 cup raisins
  • 1/4 cup dried cranberries (a bit unusual but I really like them. This was my addition to the recipe).
Vegan “Egg” Wash
  • 2 tablespoons unsweetened non-dairy milk (I used oat again)
  • 1 tablespoon pure maple syrup
Icing
  • 1/2 cup powdered sugar (I didn’t have any which is why I couldn’t get the white cross. I just ground up some caster in a pestle and mortar and used instead. The flavour was lovely but as you can see from the pic…it doesn’t look like your usual ‘finished’ bun)
  • 1/4 teaspoon vanilla extract
  • 2 1/2 teaspoons unsweetened non-dairy milk (oat)

As for the method…it took awhile. But that was ok because it was really satisfying to see them slowly rise and come to life!


I made a pizza base out of cauliflower…

Something caught my eye on the weekend…a blog post from a fantastic writer ‘Chocolate Covered Katie’. I felt like being creative, I haven’t had the time or inclination much of late. She made a pizza base using cauliflower, and as I started to Google I discovered this was a bit of a thing.

IMG_0483Half a cauliflower head was losing the will to live in my fridge and I thought it might be time to resurrect it or resign it to the bin and I REALLY hate food waste so really, in truth, the former was the only option.

A quick glance in the cupboard told me I had all the ingredients so I delved in and, last time, made myself a cauliflower pizza base complete with toppings.

The recipe was simple and promised only 5 ingredients. I thought to myself, this will either be amazing or it will be a complete flop. I’ll either be loving my dinner or trying to make the best of it!


Visit here for Katie’s recipe...or my slightly amended version is below:

  • 1/2 medium head of steamed cauliflower (4 cups of small florets)
  • 2 1/2 tbsp ground flaxseed
  • 1/4 cup water
  • 1/3 cup almond meal (I ground raw almonds)
  • 1 tsp dried oregano
  • 1 tablespoon nutritional yeast
  • 1/4 tsp garlic powder
  • 1/2 tsp salt


The process was simple….

  1. Grind your almonds and set aside.
  2. Mix the water with the flaxseed and stick in the fridge for about 20 minutes so that it becomes all gloopy and egg like – this is what will hold your mixture together – the glue if you will.
  3. Steam your cauliflower and leave to cool (squeezing out any moisture if you can)
  4. Set your oven to about 220 centigrade
  5. Blend your cauliflower to a rice consistency
  6. That’s all your prep work done…..
  7. Now….combine your almonds with your cauliflower in a bowl. Add in the flax mix and stir. Then simply add your garlic powder, nutritional yeast, salt and oregano to finish things off. I used a spatula to stir and mix it all through. It forms a loose ball not unlike dough but a little wetter.
  8. I put baking paper on a large chopping board and place the ball onto it. I simply then used the same spatula to push it into a pizza base shape slowly – evening the edges and making sure it was an even thickness throughout (about 1/4 inch).
  9. Once done – I simply popped it into the oven for 25 – 30 minutes until the edges were browned and it felt firm to touch in the middle.

In the pic below the right is the pre-cooked and the left is the cooked. I think, in hindsight I might have cooked it for a little longer as although it was firm it could have been a little firmer. The outer edges were perfect and you could pick them up and eat them just like a pizza base but the inside wasn’t as firm and had to be eaten with a fork. It would be amazing if I could actually have flipped it and cooked each side in the oven…that might be an experiment for next time.

Once the base is cooked, simply add your toppings…I went for quite a simple selection…I spread tomato paste and white miso paste as the base. I then topped with chopped tomato, onion and mushroom. Finishing it off was grated Oliana vegan cheese and basil flakes with a grind of salt and pepper.

IMG_0482

I let the edges get quite brown as I like the crunch (and they tasted delish) but you could do it with a little less enthusiasm for brown edges if you like!!

Would I cook it again? Definitely. It was so tasty and my non-vegan hubby also loved it (an unexpected win).

Thanks Katie for your inspiring and simple recipe. That’s the first time I’ve eaten pizza and felt like it was doing me good…

My Childhood Favourite Oozes and Delights

A friend sent me a food porn recommendation last week – for vegan lasagne. Its worth mentioning that lasagne was my fave dish as a child. Something about it never ceases to delight me – the ooziness of the sauce, the crunch of the lasagne pasta that always crisps up towards the edges, and of course the cheesy bechamel sauce. It was always the meal I’d ask for as a birthday treat and more often than not, the one I’d order at restaurants. So simple. So much joy.

As an adult, however, I don’t cook it very often…the mind boggling number of calories late at night isn’t often my first choice, and, of course, it takes effort. Thought and planning are involved and when I get home from work I usually just want to throw something yummy together without all the prep lasagne involves.

But last week, as I said, a good friend sent me a link on FB to this recipe from Cilantro and Citronella and all week it was bouncing around in my thoughts and teasing my tastebuds. It promised to deliver an easy to cook, delish vegan lasagne and glancing over the recipe it did, indeed, seem pretty simple.

Thursday night beckoned and I got involved, elbow deep, in chopping, prepping and seasoning and I have to say it wasn’t hard at all. The whole process took me about 40 minutes to prep and then another 45 to cook in the oven and it was (and still is) delish. The portions made enough to serve about 8 adults (my husband and I will now be eating this for dayssssss) and it really is tasty, proper tasty.

The ingredients are simple but I confess I did thrown a few of my own into the mix…they are italicised below in case you want to give this one a crack and ignore my additions.

Ingredients
  • 4 tablespoons olive oil (for the flour blend stage)
  • 2 tablespoons vegan butter (to fry the veg…my addition instead of olive oil as I like the buttery flavour)
  • 1 large red onion, diced
  • 4 cloves of garlic, minced
  • 600 grams (21 oz) button mushrooms, chopped (use the stems too)
  • 2 carrots, diced
  • 1 zucchini, diced
  • 400 grams (14 oz) frozen spinach, thawed according to the package directions and squeezed
  • 2 teaspoons salt, divided
  • Pepper, to taste
  • 2 cups (480 ml) unsweetened plant milk (they used soy, I used almond)
  • 1 cup (240 ml) vegetable stock
  • ½ cup (75 grams) flour
  • 2 tablespoons nutritional yeast / I doubled this and used 4 as it wasn’t cheesy enough for me
  • 3 cups (700 ml / about a jar and a half) marinara sauce (I bought a large tin of crushed tomatoes and added fresh basil to it)
  • 2 tablespoons white miso (blended into the bechamel sauce mix after the flour and milk have been added…gave it another cheesy kick)
  • 1 teaspoon onion powder (again added to the bechamel sauce)
  • 1 packet veggie mince fried in with veggies
  • Lasagna sheets

IMG_0470
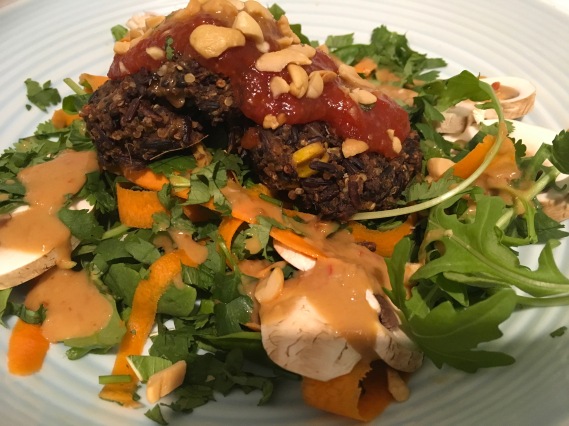
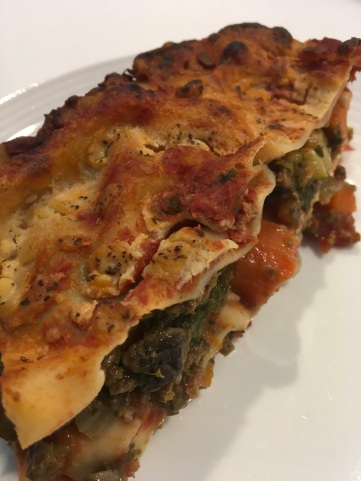
I wholeheartedly recommend this recipe to any vegan lasagne lovers out there. The only tricky bit was the bechamel sauce…which wasn’t even really tricky at all, you just had to keep a close eye on it. And my sauce was a little lumpy so I just used a hand blender to get rid of them and make sure it was silky and smooth. But the taste of the sauce is fantastic and goes so well on the lasagne. It even bubbles and browns and oozes on top…just like a cheese lasagne would…an amazing achievement to behold (and even better to taste).

Even writing this blog is making me think about eating some. Yup. Its that tasty.

Winter is Coming…

As surely as the Starks know that winter is coming, I know that one of my favourite cooking basics is back on the menu as the temperatures start to drop; soup.

I genuinely love cooking soup. And I’ve certainly learned a lot since I first stuck a bunch of boiled veg in a bowl of hot stock at uni and wondered why it didn’t taste that great. That watery uninspiring start has thankfully long been a distant memory. I learned the secret of many a good soup over the years; roast your veggies first for deeper flavour, salt and pepper them at the end so you can really closely manage it, and always use your spices and herbs to bring them to life and give them an extra lift.

IMG_0345.jpg

Two of my all-time faves to cook are pumpkin and also cauliflower.

Today, as the light began to fade, I thought to myself…its a soup kind of evening. What better to compliment the home-baked pull apart bread I whipped up this morning. An amazing garlic tear and share bread topped with a homemade parsley pesto. Yum!

Something I’ve had to adapt to is making a yummy creamy vegan soup. What to use instead of butter? What about cream? I wanted to make something that both myself and my non-vegan hubby would both love.

And thankfully, I managed it.

I use soy cream (provamel single soy cream) and organic soy milk in my creamy soups. I also used some tofutti in this one for creaminess too. Finally – I am a massive fan of the gentle chef and always make my own butter from the non-dairy evolution cookbook (a book which pretty much revolutionised my life). So – if you are keen for some creamy warming yummy wintery goodness in your belly….try this cauliflower soup. You won’t regret it!

The Starks Wintery Cauliflower Soup

  • 1 head cauliflower sliced
  • 1 litre vegetable stock
  • 3 garlic cloves
  • 3 chopped medium sized potatoes (par-boiled and peeled)
  • 1 brown onion chopped finely
  • 3 sticks celery chopped
  • 5-6 swiss brown mushrooms
  • 3 spring onions chopped finely
  • 1 cup organic soy (or other preferred milk)
  • Half cup provamel soy cream (or other preferred)
  • 3 tablespoons tofutti cream cheese
  • Tablespoon better butter (or any non-dairy butter)
  • Tablespoon peanut oil
  • Pinch white pepper
  • Teaspoon dijon mustard
  • Tablespoon nutritional yeast
  • Salt and pepper to taste
  • Parsley and fresh chives to serve

First of all, chop and prep all your veggies. Pop a saucepan on to boil and par-boil your potatoes. Meanwhile, fry up your garlic, onion, spring onions, celery and mushrooms in the peanut oil. Do not brown. The key to this soup is that we are trying to keep it as white as possible for the finished presentation.

IMG_0347.jpg
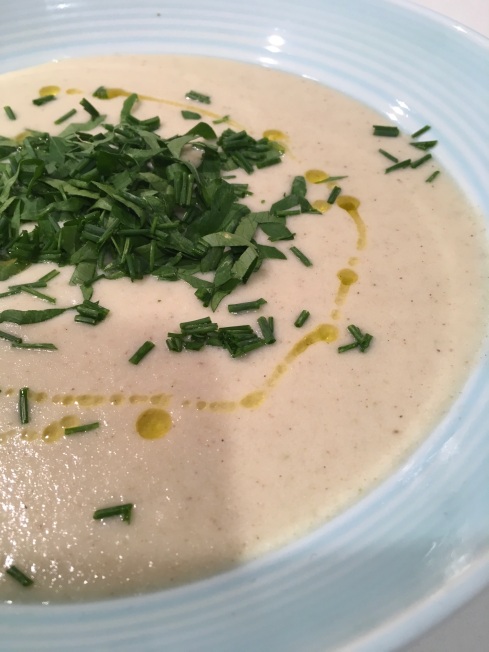
Then, add in the butter and cauliflower and continue to gently fry for about 10 minutes and add the potatoes when they are almost cooked (you don’t want them falling apart). As soon as the potatoes are added – also add the stock. Turn the temperature down (so it doesn’t boil) and let everything simmer for about another 15 minutes. At this point add the cream, nutritional yeast, mustard, white pepper and milk. Stir to combine and then use a stick blender to combine until its really smooth. Then add the tofutti for extra creaminess. Blend again. At this point – add more cream or milk to taste and start to slowly add salt and pepper as meets your tastebuds! The overwhelming flavour should be one of cauliflower. Pop it back on the hob on the lowest heat for about another ten minutes to let all the flavours infuse and then serve and ENJOY.

We had it straight out of the pan and served with the home-baked bread. It was insane. I can’t wait to have it again tomorrow for lunch. Made with love in my kitchen.

Happy souping! 


Saturday Night Treats – Two Happy Tummys

I hate being vegan…I never have anything tasty to eat. Its basically all lettuce and dust (for the little Britain fans out there!)

This couldn’t be farther from the truth…as I now find myself nearly 2.5yrs vegan one thing I’ve noticed is that my tastebuds are constantly firing as new or interesting flavours surprise them. I can truly say that the last 2.5yrs have been nothing but an opportunity for me as I have tried more different foods on a regular basis and challenged myself to cook and try more things that I probably did in the previous years combined. When I became vegan I said I wasn’t going to focus on what i’d lost (re cheese lamentation) and instead focus on what I’d gained.

I have gained so much. I couldn’t be more thankful for my dear friend Elsie who challenged me to go down this road with her. I consider my lifestyle change to be a blessing.

This weekend saw a few firsts…I ate my first fresh fig in nearly ten years and couldn’t figure out why I’d ever stopped. They are amazing. I caught up with a dear friend who I haven’t really been able to catch up with for a while and she has recently become dairy free and it was so wonderful to have that time together. And I made the most sensational (sorry to sing my own praises) dinner for my husband and I on Saturday night.

I made us a creamy pumpkin soup with a baked cashew camembert. I have to say, genuinely, I could have kept eating it until I made myself unwell.

I am a sucker for a pumpkin soup as is my hubby. The baked camembert was a first. The soup is a staple. If you are keen to try the camembert…check out Bosh on Facebook and scroll through their page. I literally saw it on Saturday morning and basically fantasised about it all day deciding to make it that same evening. I can’t share the recipe for that as it was in a video with no URL but it wouldn’t be hard to find. Search for Camembosh! It was absolutely worth the 5 mins it took me to blend it and the 20 mins of baking for the end result. Its pretty garlicky though…so be warned if you aren’t a fan.

So my soup…I thought I’d share this love-filled, heart-warmer with you all. As that’s the only way to make it, with love.

Jac’s Pumpkin Soup

  • half pumpkin – sliced and de-seeded
  • 1 brown onion – chopped for frying
  • 2 red skinned potatoes – chopped for roasting – but smaller than you would usually for roasting
  • 5 garlic cloves whole – for roasting
  • pinch nutmeg
  • pinch paprika
  • pinch tumeric
  • 2 carrots peeled and chopped – for frying
  • 1 litre vegetable stock
  • 1 carton soy / rice cream
  • 1 cup soy milk (or oat if you can’t have soy)
  • Salt and pepper to taste
  • Peanut or coconut oil for roasting
  • 2 fresh bay leaves
  • Tablespoon sugar (Any kind)
  • tablespoon vegan butter for frying

Pop the oven on to about 180, fan based. Put the pumpkin, potatoes and garlic in a baking tray (with tinfoil or non stick under them) and cover with about a tablespoon of the oil and a pinch of salt. Make sure covered. Pop in over to roast for about 40 minutes (check once and shake them around a bit.)

Whilst roasting, fry off the onions and carrots in the butter (onions first until nearly clear and a little browned for flavour). Into the pan pop the turmeric and fry the veg until a nice golden brown yellow colour. Pop onto a very low heat until the roasting veggies are done. Once done – add them to the pan and immediately add the stock and the other herbs. Plus two bay leaves. Make sure the veggies are covered and add more stock if required to cover.

Let this delicious mix simmer away on a low heat for about 30 minutes to soften the potatoes completely and for the flavours to infuse.

Post this point add in the soy milk and stir. I then blend straight away – I keep it all in the pan and use a stick blender. Once blended I then add the soy cream and the salt and pepper to taste. I also add the tablespoon of sugar (use whatever variety you prefer it really doesn’t matter). The flavour just helps to bring out the pumpkin.

Then I pop it back on the hob, on number 1 (the lowest temp) and leave it for another 30 minutes to simmer gently away and to let the flavours settle. I usually make this a little ahead of time as it gets better after a few hours. So – if you can, turn the heat off, and leave it cooling on the hob with a lid on for 3-4 hours. Serve later that same day with toasted french stick (or whatever bread you like with your soup) and the camembosh.

Truly truly yummy.

I hope you enjoy it!

And remember, this is another example of what you gain as a vegan rather than what you lose. There is absolutely no reason why this lifestyle choice should mean you compromise on your tastebuds or your health.


Taking the Taste for Granted – Chilli Jam Goodness

Where did it all begin?

Funnily enough, it began with a glut of fresh chilli growing on my balcony. My much loved (not enough watered) chilli plant has been going strong for over 5 years now. Every year I think it’s died and every year it resurrects itself. And it seems to be going from strength to strength. 2016 was definitely its year. We had chilli galore and the entire jam idea began from a simple conversation with my husband that went along the lines of… ‘What on earth are we going to do with all this chill?’ 

Much to his surprise, having never made a relish or a jam in my life prior to 6 months ago, I announced that I was going to make a chilli jam. I think my words went along the lines of, ‘how hard can it be?’

What’s easy about jam, I have discovered, is making it. Its not arduous and its not complex. But what’s hard about jam, which I have learned since the heady days of my first successes, is that its hard to make it consistently well with a depth of flavour and to achieve that same depth batch after batch.

I am simply a women who loves to cook, who loves bold flavour and who loves knowing exactly what’s in her food. That’s all I ask for in a meal – for my taste buds to be delighted and for my body to benefit.

I firmly believe that we are what we eat and my jams are an extension of that belief. They have nothing in them that you can’t pronounce. Nothing in them that’s processed. They are simple and made with love in my kitchen.

File 9-4-17, 1 55 13 pm.jpeg

And so the jam making began in earnest. Chilli came first because, for no other reason, that’s what I had in season on my balcony. And I confess I have gone from being someone who hardly ate any chilli jam, to someone who can’t get enough of it. On everything. I hope that’s what you find too when you try it.

It works with meat, cheese, roasted veg, salads, on toast, with avocado and apparently (a genius idea from Tim) with an egg and bacon slider (smiles). 

Welcome to my jCF386171-2ADA-4E59-9E50-E9B663600D33
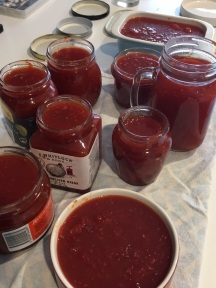
ams and welcome to my kitchen. I hope you enjoy them as much as I love making them.

Next up will be some experimentation with a rosemary / mint jelly and perhaps a ‘winter is coming’ Game of Thrones inspired shiraz jam.

I am super excited to be working with Tim and Bluesalt Catering and look forward to being part of their menus.

Happy Jamming everyone. Don’t forget to indulge and to feel free to take them for Granted.

Bread and tomatoes…its the simple things

2017-01-14 12.24.19.jpg
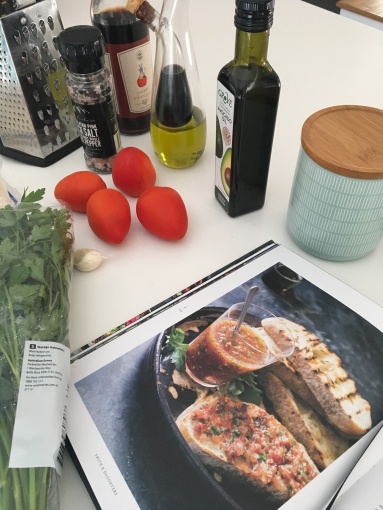
Its the simplest things in life right.

I recently bought an amazing vegan cookbook by Smith and Daughters which has been something of an affirming life force for me. Everything I’ve cooked from it thus far has been stunning. Their recipes are PACKED with flavour and I love love love big flavours.

One of the recipes is a pan con tomate (bread with tomatoes) which is sooooo good I had to share my version of it. Its simplicity is its brilliance. Its an amazing take on a Spanish classic which both my husband and I have completely fallen in love with (I think i’ve made it 5 times now and he’s also made it for his family too).

I wanted to share it here and just put it out there…its pure vegan joy to eat this and its one of those things that you can cook for others and they won’t care that there is no dairy or meat in it because its so bloody tasty.

Here goes:

  • 5 tomatoes (grated including the skins)
  • 2 tablespoons avocado oil (or olive)
  • 1 tablespoon sherry vinegar
  • Generous handful of finely chopped parsley or Basil (both work brilliantly)
  • pinch himalayan pink salt
  • cracked black pepper
  • teaspoon caster sugar (fine)
  • 1 crushed / minced garlic clove

fb_img_1485928889054
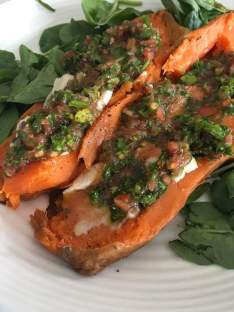
All you have to do is put all the ingredients together into a bowl…and stir away until they are combined.

Leave for a bit to the side to let all the flavours marinate and then serve however you fancy it…on simple griddled bread is my fave so far but its also sensational on baked sweet potato.

Please try this. Its absolutely amazing and one of the simplest things I have ever served up. Tomato JOY.

Its getting hot in here…the story of my sweet chilli jam.

This week I had one of life’s epiphanies. It was about jam. Chilli jam, to be specific.

2017-01-17 19.31.10.jpg
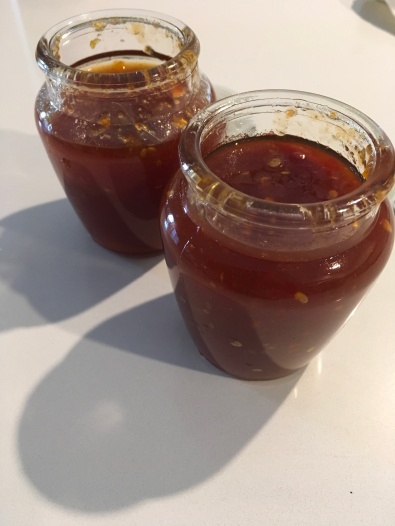
The epiphany..? Its easy to make. I’ve been spending money for years on gorgeous, delicious, organic sweet chilli jams from delis all over the country and yet it had never occurred to me to try to make my own. I assumed it involved a lot of elbow grease, took hours and hours and was fairly complex. All stories I had made up in my own head with no grounding in anything whatsoever.

Historically, I don’t have a great relationship with jams. Since my sister and I worked on a fruit picking farm as teenagers hoping to make our millions, I have barely touched the stuff to be honest. It was one of those ‘now that I know what’s in it I don’t want to eat it any more’ moments. I won’t go into detail for any jam lovers out there. I’d hate to spoil your breakfast 😉

Suffice to say, I really have no interest in jam, apart from the odd occasional green or red chilli jam which for some reason my brain excuses (isn’t the brain amazing). I think its because I was picking sweet fruit for jam and for some reason my brain has decided that chilli probably doesn’t share the same fate as fruits in the jam picking process, who knows. Anyway, the point is…I LIKE CHILLI JAM.

My husband and I have this amazingly stoic chilli plant on our balcony which every year threatens to cark it and somehow, every year, makes it through. Its into its 5th year now and I think this year was the most bumper of any years in terms of yield. We have chilli galore and I commented to him, ‘what on earth are we going to do with all of this chilli?’ ….and there was the epiphany. Somewhere in my brain a little light went on and I thought…ok…dammit…I’ll try to make my own.

So on Weds, as a complete jam making virgin, I entered into the unchartered world of making your own jams with no idea whatsoever what I was doing or whether it would taste good / set or whether I was about to waste a beautiful yield of fresh, organic, home grown chilli on a whim. 

How did I begin? I simply googled sweet chilli jam and followed the first recipe I found which was lucky as I had all the ingredients in the cupboard. It’s this one:

http://www.bbcgoodfood.com/recipes/8257/sweet-chilli-jam

The ingredients were pretty simple:

  • 8 red pepper, deseeded and roughly chopped
  • 10 red chilli roughly chopped
  • finger-sized piece fresh root ginger, peeled and roughly chopped
  • 8 garlic clove, peeled
  • 400g can cherry tomatoes
  • 750g golden caster sugar
  • 250ml red wine vinegar

I added a few of my own along the way (up to you if you want to follow suite):

  1. 2 tablespoons Apple sauce
  2. 2 tablespoons agar agar powder (as I wasn’t convinced it would set having never tried it before)
  3. 5 tomatoes with skins at blending stage
  4. Another 100g caster sugar as when tasting close to the end it was a tad too spicy still for me

2017-01-17-18-10-47
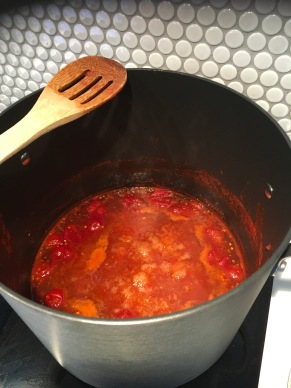
The method was also bonkers simple. Literally there are no cooking skills involved in this recipe except chopping, blending and stirring. If you can do that…you can make your own jam.

METHOD:

  1. Tip the peppers, chillies (with seeds), ginger and garlic into a food processor, then whizz until very finely chopped. Scrape into a heavy-bottomed pan with the tomatoes, sugar and vinegar, then bring everything to the boil. Skim off any scum that comes to the surface, then turn the heat down to a simmer and cook for about 50 mins, stirring occasionally.
  2. Once the jam is becoming sticky, continue cooking for 10-15 mins more, stirring frequently so that it doesn’t catch and burn. It should now look like thick, bubbling lava. Cool slightly, transfer to sterilised jars, then leave to cool completely. Keeps for 3 months in a cool, dark cupboard – refrigerate once opened.

The result was sensational.

2017-01-18 18.23.24.jpg

It set perfectly and cooled overnight to reveal this magical jam in the morning which tasted amazing. So good in fact I immediately had it for breakfast on toast with avocado (and a massive smile on my face). One recipe made so much that I divided it into 7 jars and shipped it off to my mates. When I think that one jar to buy is about $10 and I made 7 jars for about the same amount…that’s pretty cool.

If I am feeling brave enough I think i’ll try a homemade onion jam next. I mean, how hard can it be right?

Happy jam making all (but maybe don’t get a job fruit picking). Smiles.


Celebrating two years a vegan with…hummus

So…just quietly, I am celebrating two years of my vegan journey. I can’t believe its been two years…seriously, where have the last two years gone?

And what better way to celebrate it, from a self-confessed, and obsessed, hummus eater, than with, well, hummus! Wine is so passe! Ha.

Whilst scrolling through Pinterest for food inspiration the other evening, I stumbled upon what might well be the most brilliant of all combinations….hummus with peanut butter. My curiousity was immediately piqued and I straightaway decided that a supermarket run was in order.

The recipe I talk of is not mine, I can’t claim any ownership for it, but I do want to share the love as its simply amazing. I have eaten FAR too much of it the last few days as it makes an amazing accompaniment to a buddha bowel. Tops it off perfectly.

The recipe is from a food blogger called fooduzzi and its genius. Its a thai, sriracha, peanut butter based hummus. http://www.fooduzzi.com/2016/03/thai-peanut-hummus/

WOW. Is all I can say. I followed the recipe to the exact quantities thinking, this might be odd or this might be amazing, as I did it. And it was the latter. Who would have thought that peanut butter could be a hummus ingredient…the question now is, can I use it every time I make hummus? Not sure my thighs would agree it was a good idea but my tastebuds definitely do.

20170105_162642.jpg
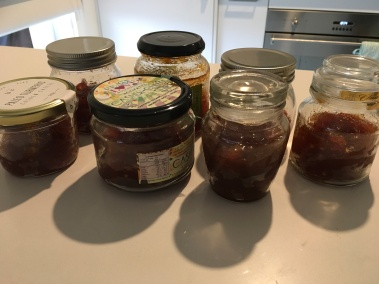
It took less than 5 minutes to make and went from blender to mouth in under that…

Here’s my delicious dinner buddha bowl complete with it. Yummy roasted beetroot and sweet potato, with hummus, peanuts, spring onion, raw zucchini, cherry tomatoes and Avo.

Marvellous.

Happy Thursday all.


Why am I still buying pesto?

I made my own pesto the other night and it made me wonder, why am I ever buying pesto? It took me about 5 minutes in total, was damn tasty, and I knew exactly what was in it. Are we so far removed from what we eat that we always take the easy way out? Sometimes it feels like that. I include myself in this observation.

Many years ago I read an amazing book called, ‘What’s not on the label?’ which my brother recommended to me and it was one of those aha moments when you realise there is a lot of sh** in the processed stuff we eat. Upon completing the book I literally stopped eating as much processed food as possible. I no longer buy any pre made soups, jams, sauces, dinners, and (as much as possible) buy my fruit and veg from local suppliers. Why? Because of the way food is preserved, stored, modified, packaged and transferred. It was eye-opening and terrifying. Everything we think we know, or the assumptions that we made…we should question when it comes to mass processed food production. 

3280f4f84fa0ffb037d473a5524a1387The book started with an amazing observation from the author of going into a supermarket and standing in the fresh fruit and veg section and wondering why none of the fruit and veg smelled. Why couldn’t she, standing in the middle of it all, smell anything? It’s worth pondering and that’s exactly what the book does.

So, despite everything I’ve learned I still on occasion buy pastes for convenience (curry and pesto) as they are so easy and convenient. I also buy pickles as I haven’t yet figured out how to make a good pickle. However, upon seeing an amazing Donna Hay recipe for a macadamia pesto which seemed very vegan modifiable I thought I’d give it a try. And my, it was easy, cheap and really tasty.

Perhaps its time to cut to the chase and stop buying them too. I think its important in these times to be more and  more connected to what we eat and to resist what’s easy as what’s easy is often filled with something that wasn’t easier down the chain…for the orangutans who’s habitat is being destroyed for palm oil, or the farm animals killed for gelatine by products and the rest, or the fish who have not been sustainably sourced, or the local water source for many regional people poisoned by industry...you know how it goes. Easy for us isn’t actually the best choice. In fact I think the opposite might be true.

So in the spirit of not choosing the easy way – here’s my homemade pesto which I invite you to try and to love as much as I do!

Macadamia Rocket Pesto

  • 40gm roasted macadamias
  • handful fresh rocket
  • half bunch fresh basil (or more you can alter to taste)
  • 2 tablespoons olive oil
  • handful (Generous) of any firm vegan cheese (I used one I’d made at home from the Gentle Chef but I think any firm tangy vegan cheese will do. Don’t use a mild one)
  • half garlic clove
  • black pepper and salt – pinch

BC0875DF-C70A-41CB-8F05-A6E9B3056A19.JPGSo the only work you have to do here is roast the macas. Once done – you simply put it all in a blender and away you go. This did me 4 serves. Delightful. That’s it. Tastebuds happy.

I am far from perfect and the first to point the finger (at myself) but here’s to awareness and to not taking the easy route.